|
This rig was one i'd seen get raved about, both on the TV, in video's and in angling publications. It has a multitude of uses and can be used with different bait arrangements, but it's main purpose is to present a popped up bait and is often used in conjunction with a 'solid bag'. This can be a simple pop up boilie, wafter or snowman arrangement. Although it is used with a 'hair', the way it is tied means the hair exits the shank of the hook at an acute angle, as opposed to your bog standard 'hair rig' set up. The aim is to ultimately create a balanced bait, where the hookbait sinks slowly under the weight of the hook and a shot, so that the hook comes to rest flat on the lakebed, while the bait hovers above. Ideally the rig is best used on fairly clean areas of lakebed. So how do you tie it up? 1) Take your choice of hook - a Curved Shank pattern is the norm for this rig. Also take a length of hooklength material. I use Suffix Kameleon or Camo Skin in 25lb. 2) Strip back a 3" section of your hooklength material if it is coated. As with the Multi rig you may need to strip less if you are a more proficient rig tier! Form a small, overhand loop in the end to form the hair. I've tied it a little larger for the purpose of the guide so it is all clear. 3) Pass the hooklength material through the 'back' of the eye (Side facing away from the shank of the hook), until you have the desired length of hair to accept your bait. You will also need to leave around 10-15mm free between where your hookbait would sit and the eye of the hook (This ultimately is where the shot will go, to finish the rig off and gain the presentation you require), but it depends on how far you would like your bait sat off the bottom. 4) Trap the hair against the shank, take the hooklength and begin to whip up the shank of the hook to tie a normal knotless knot, but after a couple of whips pull the hair out and away from the shank, before going around it with the hooklength and continuing to whip up the shank. This creates the unique angle with how the hair comes away from the shank (See below). 5) Once you've whipped up the shank your preferred amount of times (7-8 times is fine, but if you are casting long ranges and attaching PVA bags you may want to whip a few more times to keep everything straight and secure. Big casts can pull the hair out of position if not), pass the hook length back through the back of the hook eye as normal. With practice you are aiming for the 'uncoated section' of the hooklength mentioned in point 2 to finish around 10mm away from the hook eye. This aids in the movement of the rig once in use. Attach a swivel/link loop to the other end of the rig and at this stage the rig is pretty much complete. You can add putty to the hooklength if you wish, to pin it down once in use and to aid in hooking. You can see in the image below to coated and uncoated sections of the hooklength. 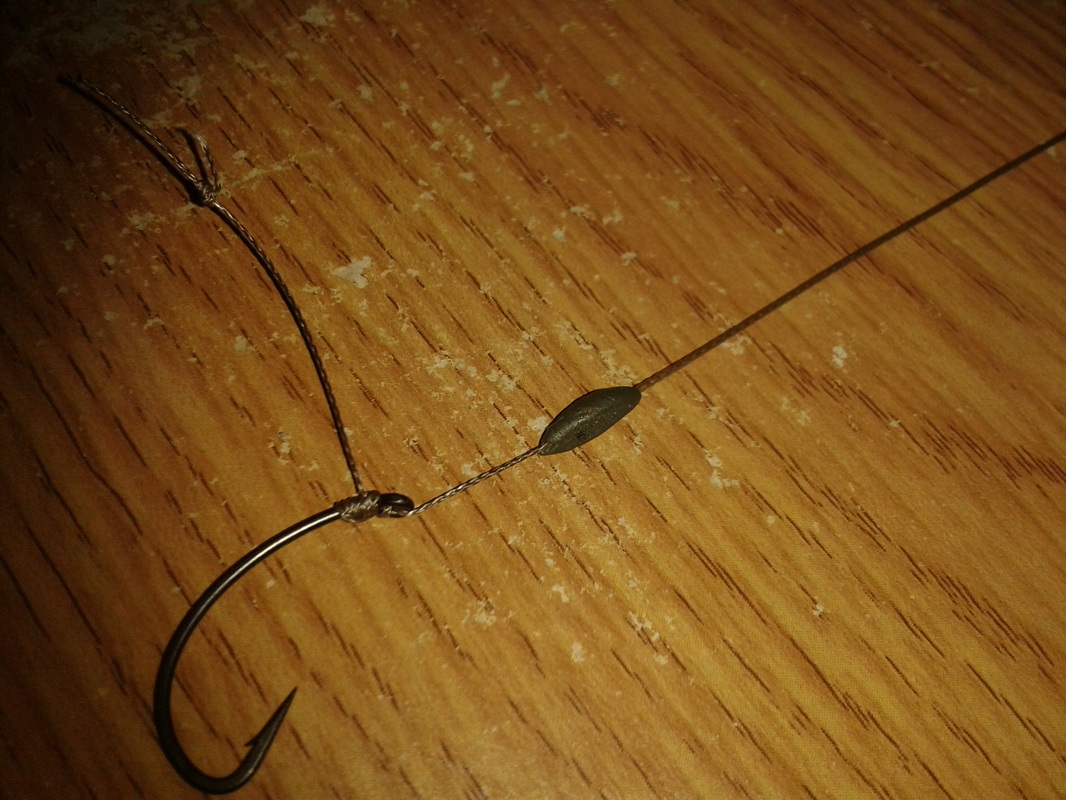 6) You can then mount your bait and attach your shot to anchor it down once in use. Generally a BB will be sufficient, but with custom hookbaits you could alter the buoyancy so the hookbait does not require as much weight to anchor it down. When the bait is mounted, the rig should look like this (The bait is a 14mm Xcel Baits Banoffee pop up). For the purpose of this guide i've tied the hair up slightly long so everything is clear. 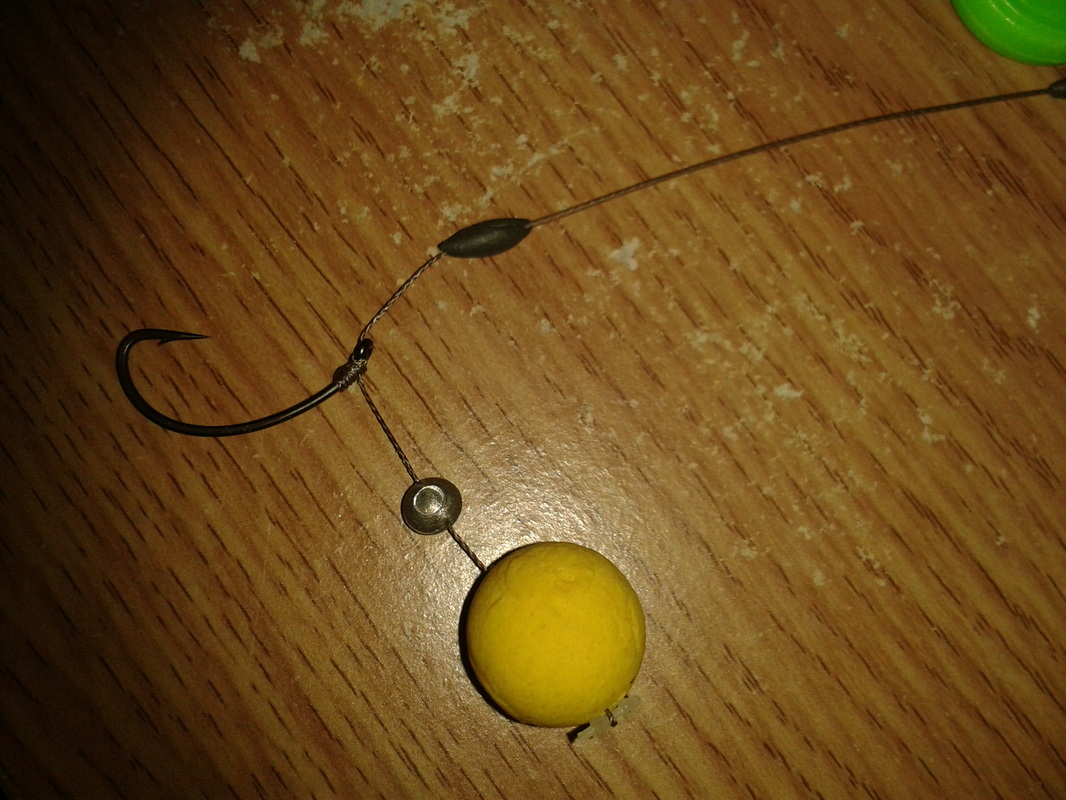 This rig nails fish really well and on the occasions i have used it and can't recall ever dropping a fish on it. If i know 100% the spot i am fishing is clean and i wanted the hook out of the way on the deck, whilst fishing a pop up, this is what i would turn to.
Tight lines, Dan
0 Comments
I was first shown this rig a few years ago by Northeast angler Paul Scott, whilst i was struggling getting my head around fishing in a situation that was new to me. The first night i used the rig, it was 2-0 to me and i have used it ever since for most of my Carp fishing. The simplicity and versatility of the rig is why it is so good and it has been written about in many of the angling magazines in the past few years. It re-sets well and i have found it to really nail fish - I can honestly say i've lost very few fish on it since i began using it. For presenting pop ups, it's my favourite rig. So, how do you tie it up? 1) Take a length of your chosen hooklength material. I tend to use Suffix Kameleon or Camo Skin in 25lb. This is a coated material. 2) Strip back around 3" and tie an overhand loop in the braid you have just exposed (I'm all fingers and thumbs so i always strip plenty back - the more proficient rig tier won't need to strip as much). The loop will be used to attach the hook and with practice you are aiming for the coated part of the braid to finish just above the knot you have just created. This aids in the rigs movement once in use due to the short bit of exposed, uncoated material near the knot. Ensure the loop isn't too small, otherwise it will not slide over the hook! (You can tailor the size of the loop to suit how far you want your bait to sit off the bottom) 3) Take your choice of hook and a bore ring/screw (My preference is to use a bore ring/screw but you can also use a micro swivel or a rig ring). The hook in the image below is a Sz.8 PB Products Chod just for reference. You can also use this rig with curved shank and widegape patterns, but generally the Chod is the 'go to' pattern. 4) Thread the loop you made before through the eye of the hook from the inside (point side). At this point, thread on your preferred item for bait attachment (Bore screw/micro swivel/rig ring) and then pass the loop over the hook to 'lassoo' the hook in place. 5) To finish the rig off, attach the other end of the rig to a swivel, link loop or whatever it is you prefer to use via a Palomar Knot. You could include an anti tangle sleeve at the swivel end if you were that way inclined to aid with kicking the rig out straight. Then place the required amount of putty around the loop knot. Adjust to suit the pop up you are using. 6) Attach your bait and off you go! The business end of the finished rig should look like this... 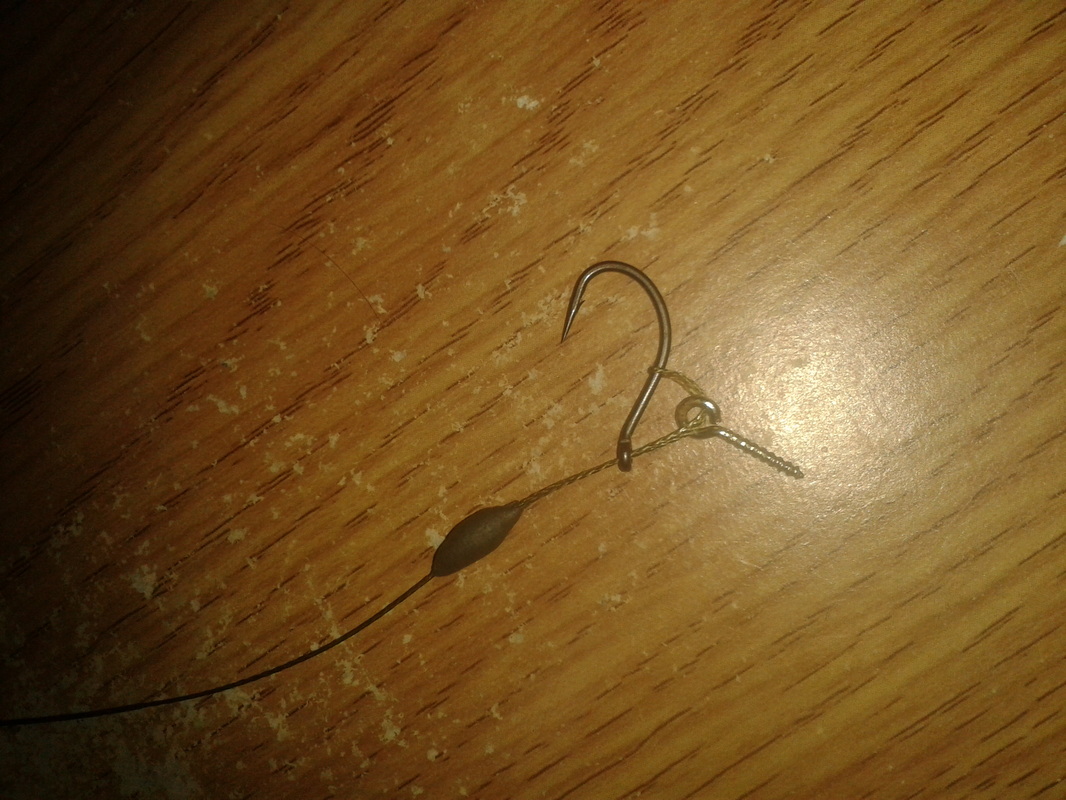 If anyone decides to give the rig a go on the back of reading this, then good luck and i hope you bag some crackers on it.
Tight lines, Dan. |
 RSS Feed
